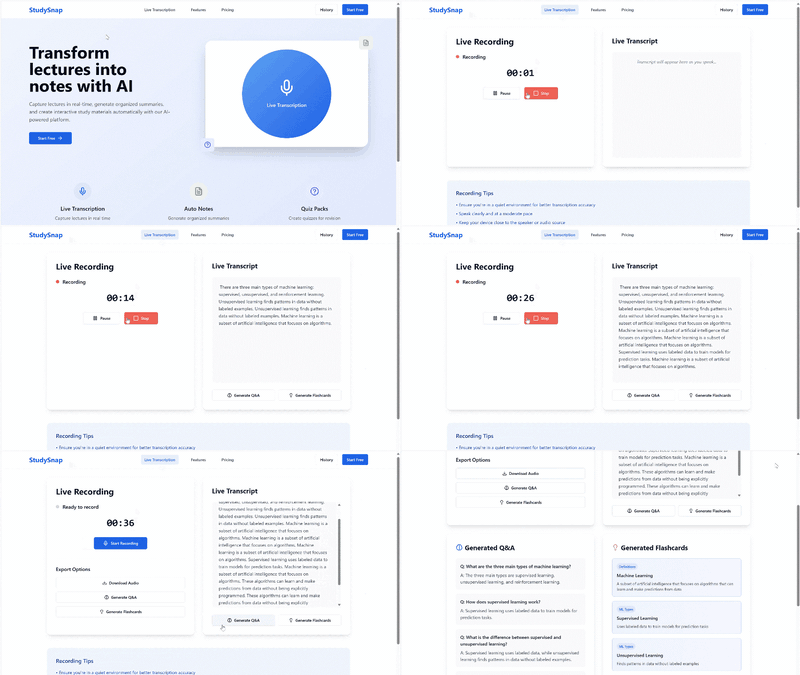
PM Workshop · Pre-Read
Project Nebula
Pre-read · Session 3
Building scalable, secure, end-to-end AI prototypes with modern coding agents.
Aug 2025

AI brain visual
Recap
Journey so far..
Session 1
Hands-on expertise
Used AI to transform our idea into impactful designs to communicate our vision effectively.
Session 2
Click-through prototype
Learned the basics and translated those designs into a UI prototype that simulates the app flow.
Session 3 · Today
Functional end-to-end
Evolve to building functional and scalable end-to-end prototypes — backend, AI, deployment.
Concept → Design
Design → UI prototype
UI → end-to-end product
AI
PM Demo
Timeline
First things first
Design for scalability and security
Don't just think about the UI and front-end — plan for scalability from day one.
Backend-first architecture
Why prioritize a backend layer from the start:
Paves the way for seamless future integration of services and capabilities.
Ensures security by preventing API credential exposure on the front end.
Optimized app data storage and management.
Smoother server deployment or hosting.
How to add a backend?
Just ask your AI coding agent at the time of kicking off your project. (Details in further slides)
api
.env
db
Backend-first · Security · Scalability
Today's session
Activity plan
We will follow a two-step plan for today's activity.
Step 1
Create front-end UI
Skeleton screens with mock data
Support with robust backend
API layer, env config, storage
Step 2
Integrate AI via backend
Call your LLM provider server-side, not from the client
Front-end first, then backend, then AI
From simple to scalable
Evolving from x to 10x
100 demos from 100 PMs in session 2.
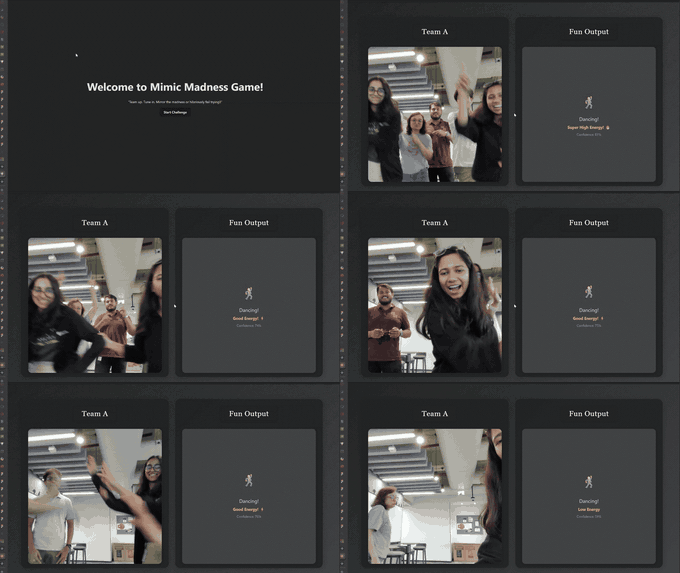
Demo 1
Demo · 01
Demo 2
Demo · 02
Demo 3
Demo · 03
We saw some really fun prototypes during session 2.
But how do we build applications with much higher feature complexity?
Going from a click-through prototype to a real, multi-flow product means thinking about state, integrations, auth, persistence, and AI behavior under edge cases.
100 PMs · 100 demos
What we'll cover today
Session goals
01
Process & best practices
Understand how to build scalable, end-to-end prototypes — the workflow that gets you from idea to a working product flow.
02
Influence your coding agent
Explore strategies to nudge AI coding agents (Copilot, Cursor, Claude Code…) toward high-quality, predictable outcomes.
03
Wire up an LLM API
Configure and integrate a cloud LLM service (Azure OpenAI, OpenAI, Anthropic, Bedrock…) to power AI-driven functionality from your backend.
04
Deploy & share
Deploy and distribute the prototype within your team so others can test, click around, and feed back.
Check out the Resources section for more topics — including hosting, MCP / tool integration, and Git versioning.
Part 1
Session pre-requisite
Spin up the cloud credits and LLM endpoint you'll need before we start building.
$
SPACE
Step 01
Activate free cloud credits
Most major cloud providers offer free credits for development — Azure, AWS, GCP, or via partner programs.
Azure · AWS · GCP · Anthropic · OpenAI
Step 01
Set up free cloud credits
Action
Follow your provider's free-tier onboarding flow.
Examples:
Azure
Visual Studio Subscription Benefit / Azure for Students.
AWS
AWS Free Tier · Bedrock model access on signup.
Anthropic / OpenAI
Console signup credits for API trials.
Tip
Use your work account where allowed — many enterprise subscriptions include developer credits you don't have to expense.
Step 02
Configure your LLM API credentials
Stand up a model endpoint and grab the key. We'll use this from our backend in a few slides.
Step 02
Spin up a model resource
Inside your LLM provider (Azure OpenAI / OpenAI / Anthropic / Bedrock), create the resource that will host your deployment.
Action
Log in to your provider's portal with your provider account.
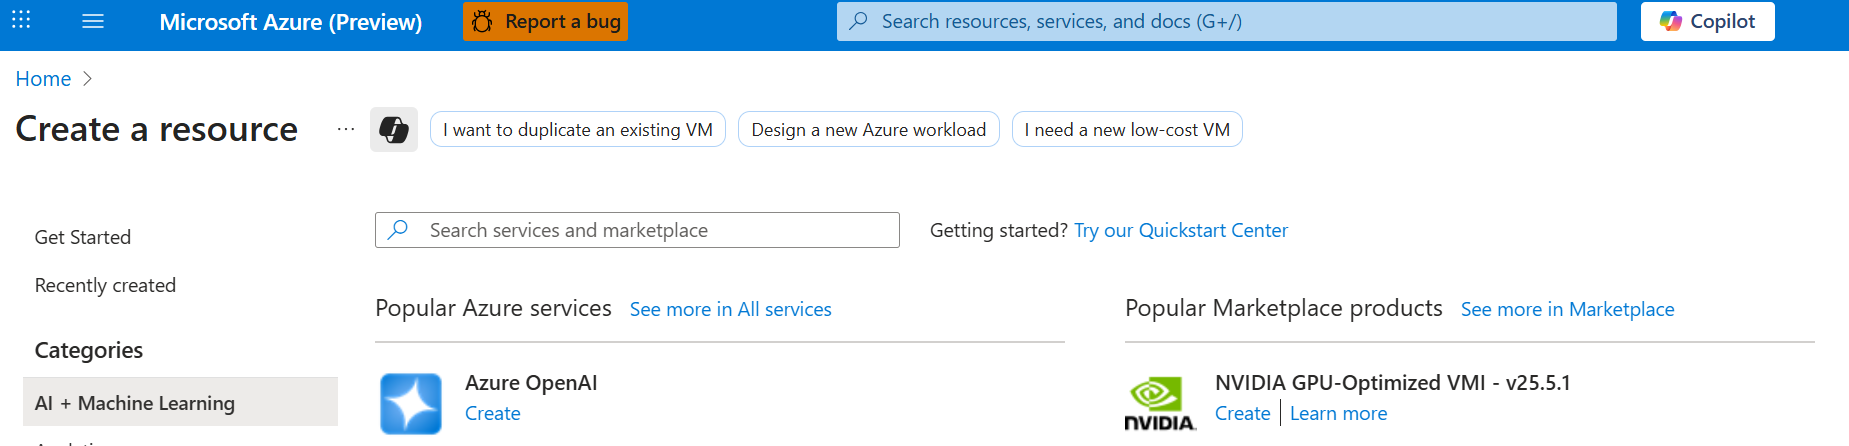
Open the LLM service and click Create a new resource.
Fill in the basics: name, region, pricing tier. You can skip tagging.
Review and create — provisioning usually finishes in under a minute.
Heads-up
Each provider names things differently — "Resource", "Project", "Workspace" — but the flow is the same.
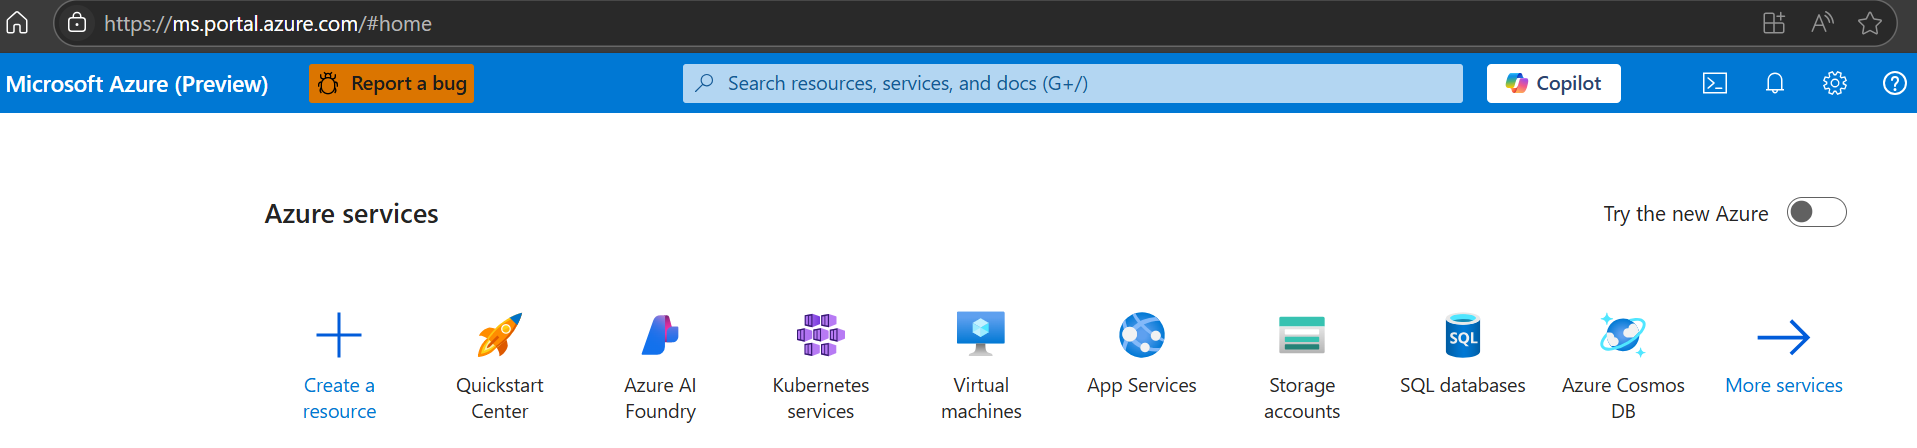
Provider portal — create resource list
01 · Open service
Provider portal — fill resource details
02 · Configure & create
Your provider's portal will look similar.
Provision · Configure · Create
Step 03
Open your provider's model portal
Once the resource exists, jump into the provider's model studio — the place where you browse, deploy, and test models.
How to navigate
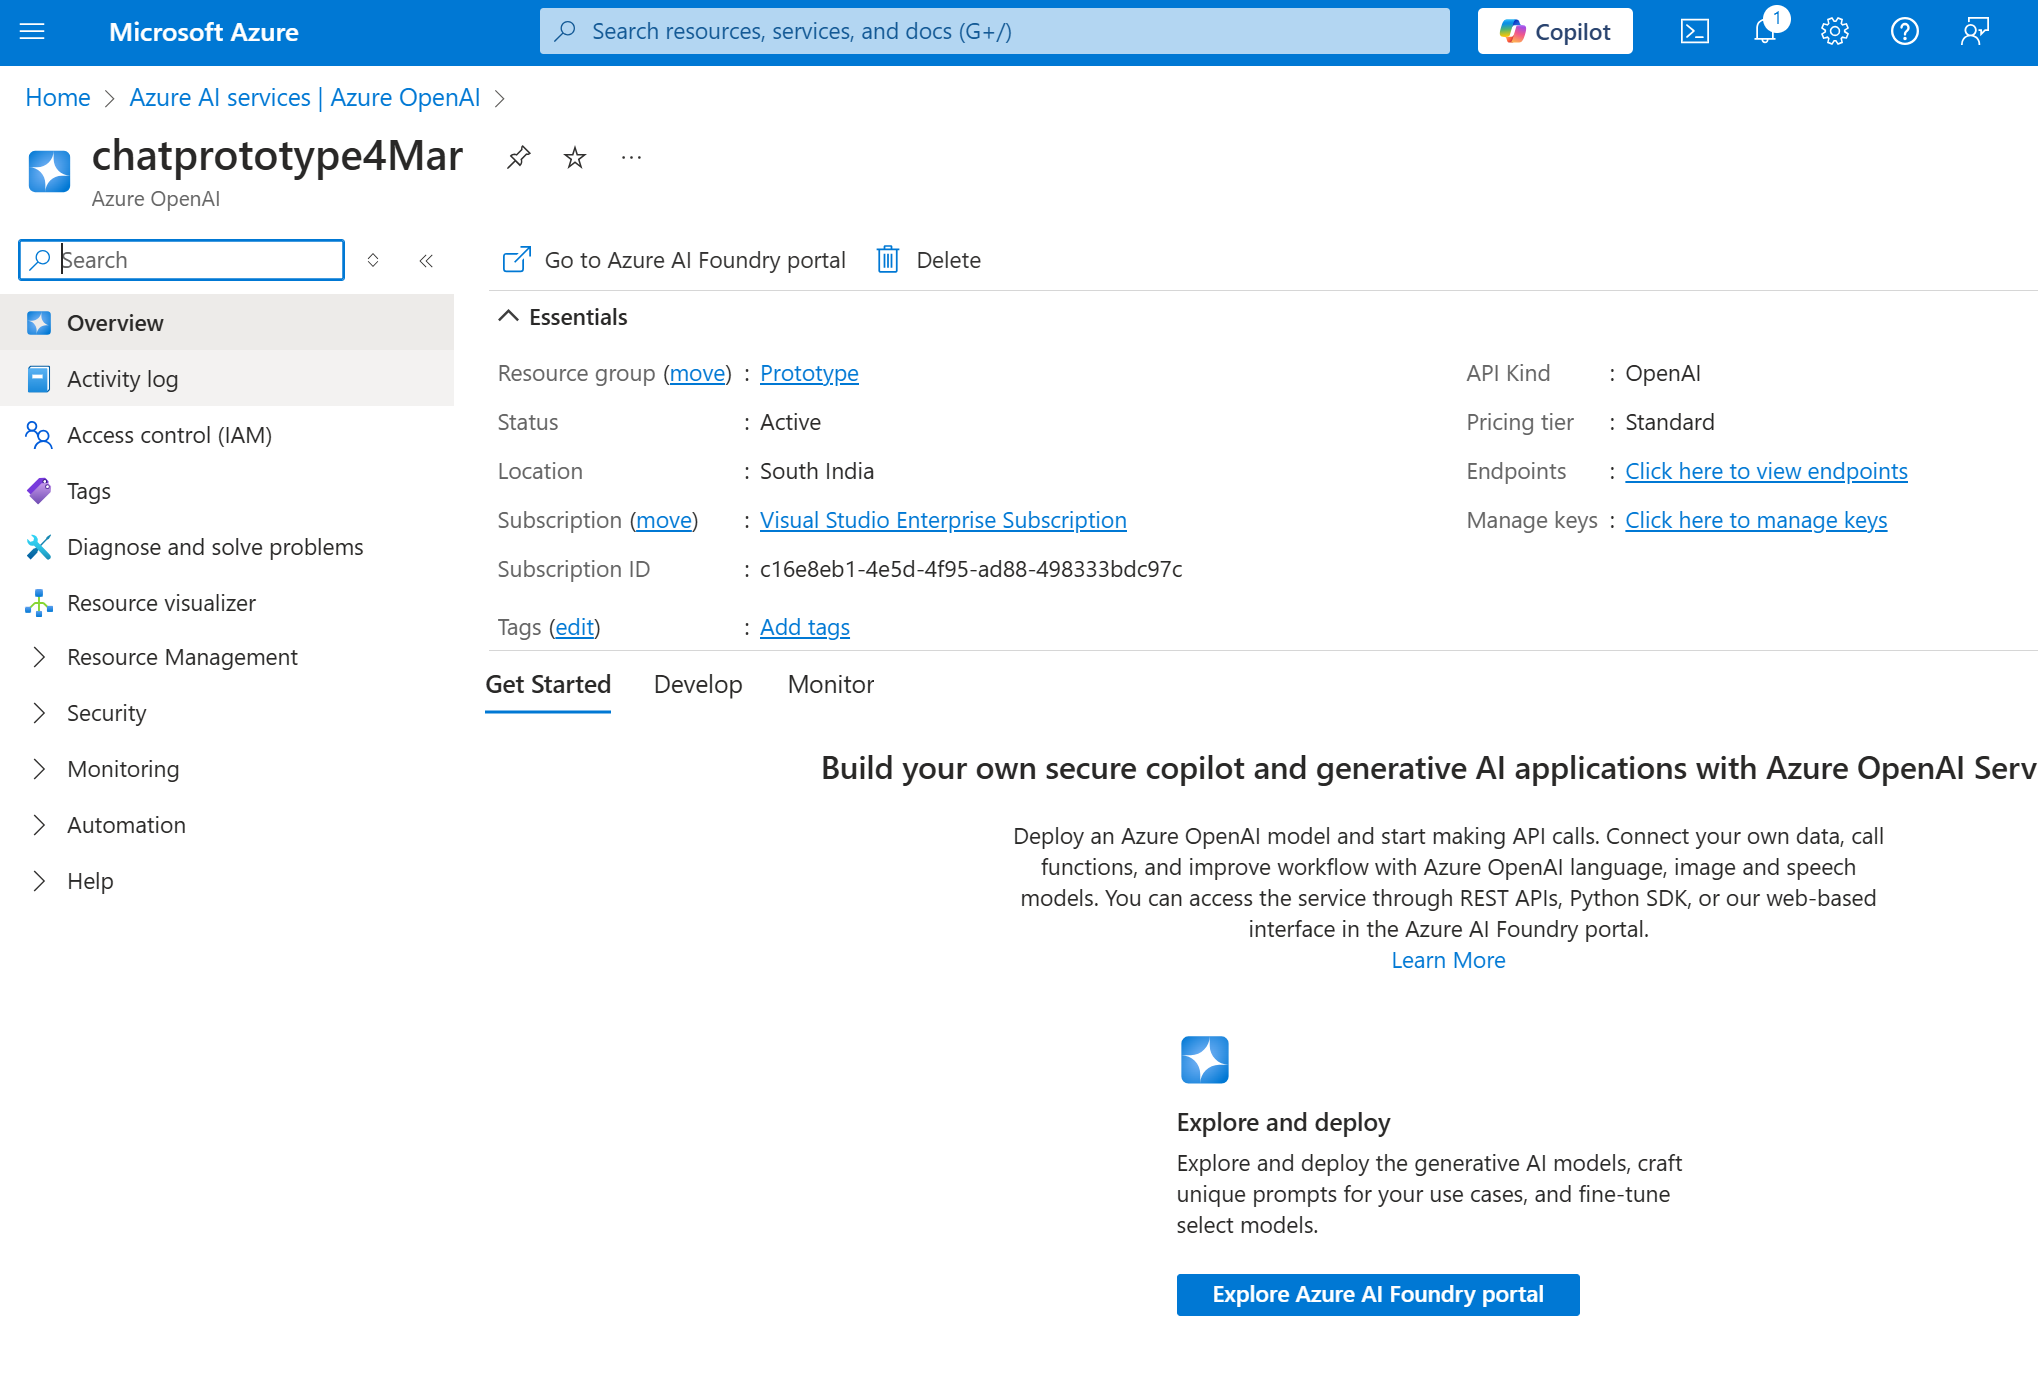
From the resource home page, open the resource you just created.
Match the icon and name to find the correct one if you have multiple.
Click Explore the model portal (or equivalent — "Open Studio", "Open Workbench").
tip
Bookmark this portal — you'll come back to it every time you swap models or rotate keys.
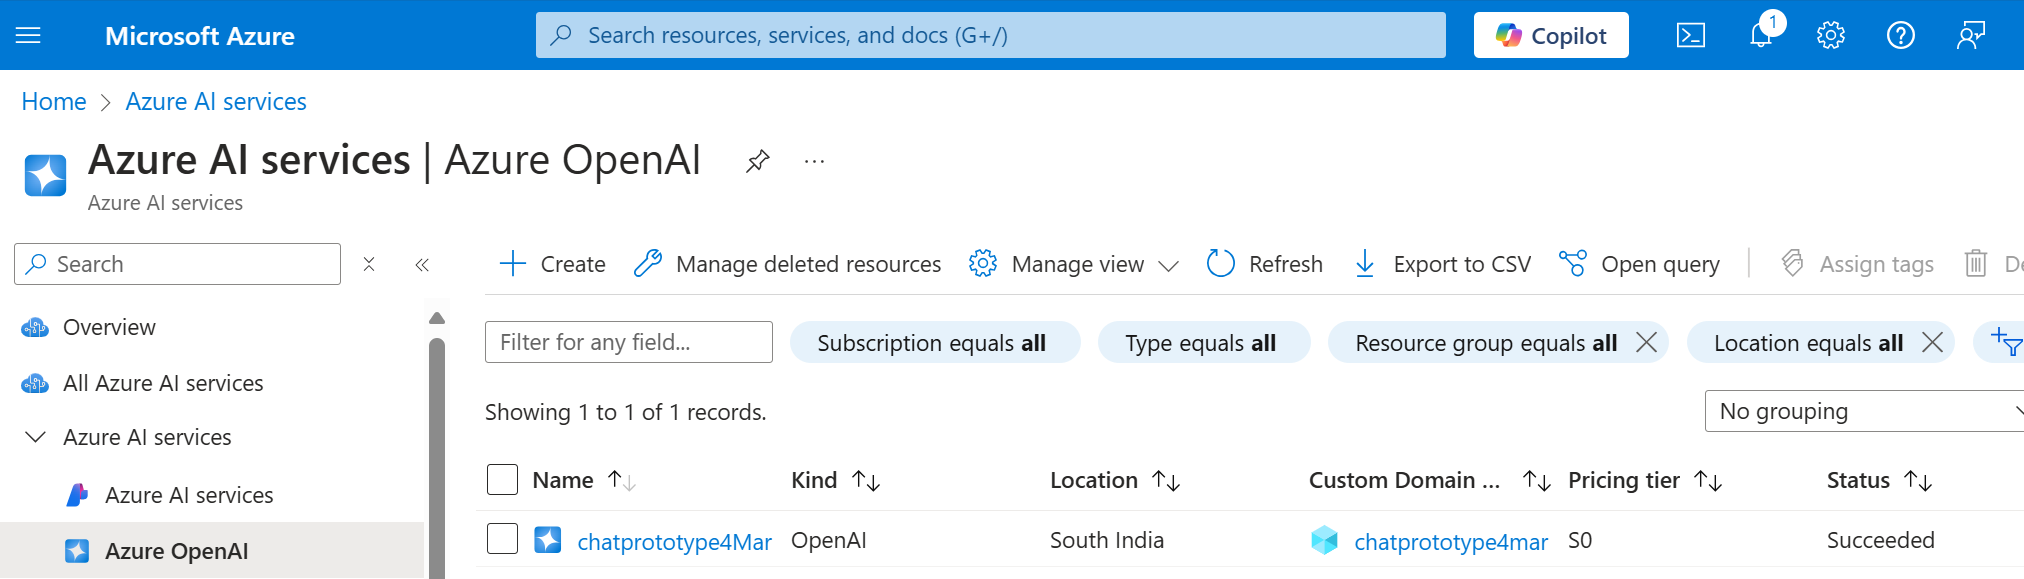
Resource list — pick the right one
01 · Find resource
Open the model portal
02 · Launch portal
Your provider's portal will look similar.
Locate · Open · Explore
Step 04
Deploy a model
Browse the model catalog and stand up the one you'll call from your backend.
Action
Open the Model Catalog inside the portal.
Pick a frontier general-purpose model.
Click Deploy — give the deployment a memorable name.
For example
GPT-4.1
Claude Sonnet
Llama 3
Gemini 1.5
Pricing note
Pick a tier that matches your free credit balance. Smaller models are cheaper for the warmup phase.
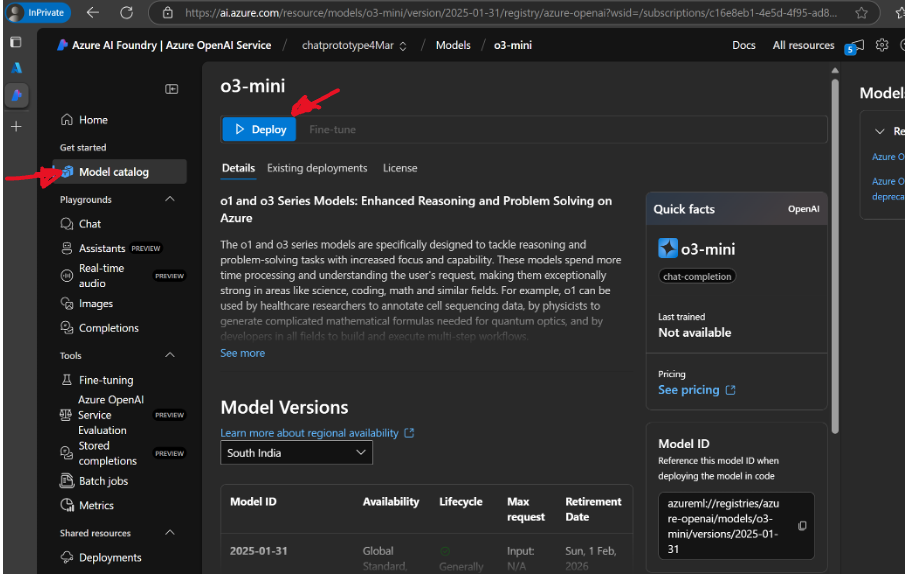
Model catalog — deploy a model
Model catalog
Your provider's portal will look similar.
Browse · Choose · Deploy
Step 05
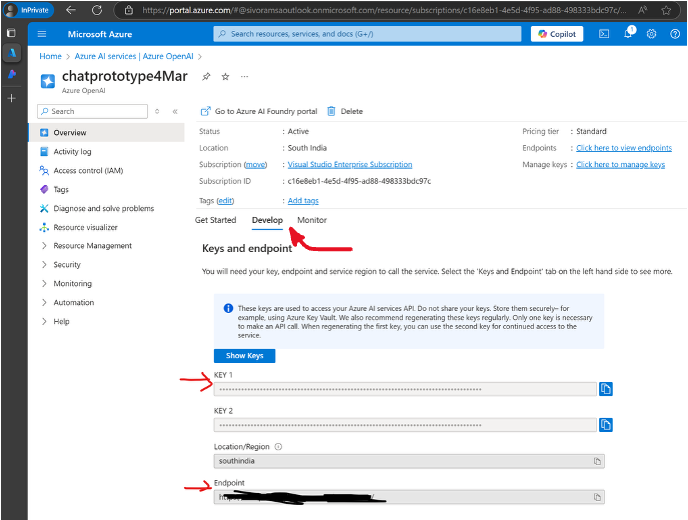
Wire the model into your app
Three values to copy out of the portal — then we never type them again.
01
Deployment name
e.g. my-recipe-bot
The label you gave the deployment in Step 04. You'll reference this in API calls.
02
Key 1
use either Key 1 or Key 2
Your authentication secret. Treat it like a password.
03
Endpoint URL
<your-resource>.openai.example.com
The base URL your backend will POST against.
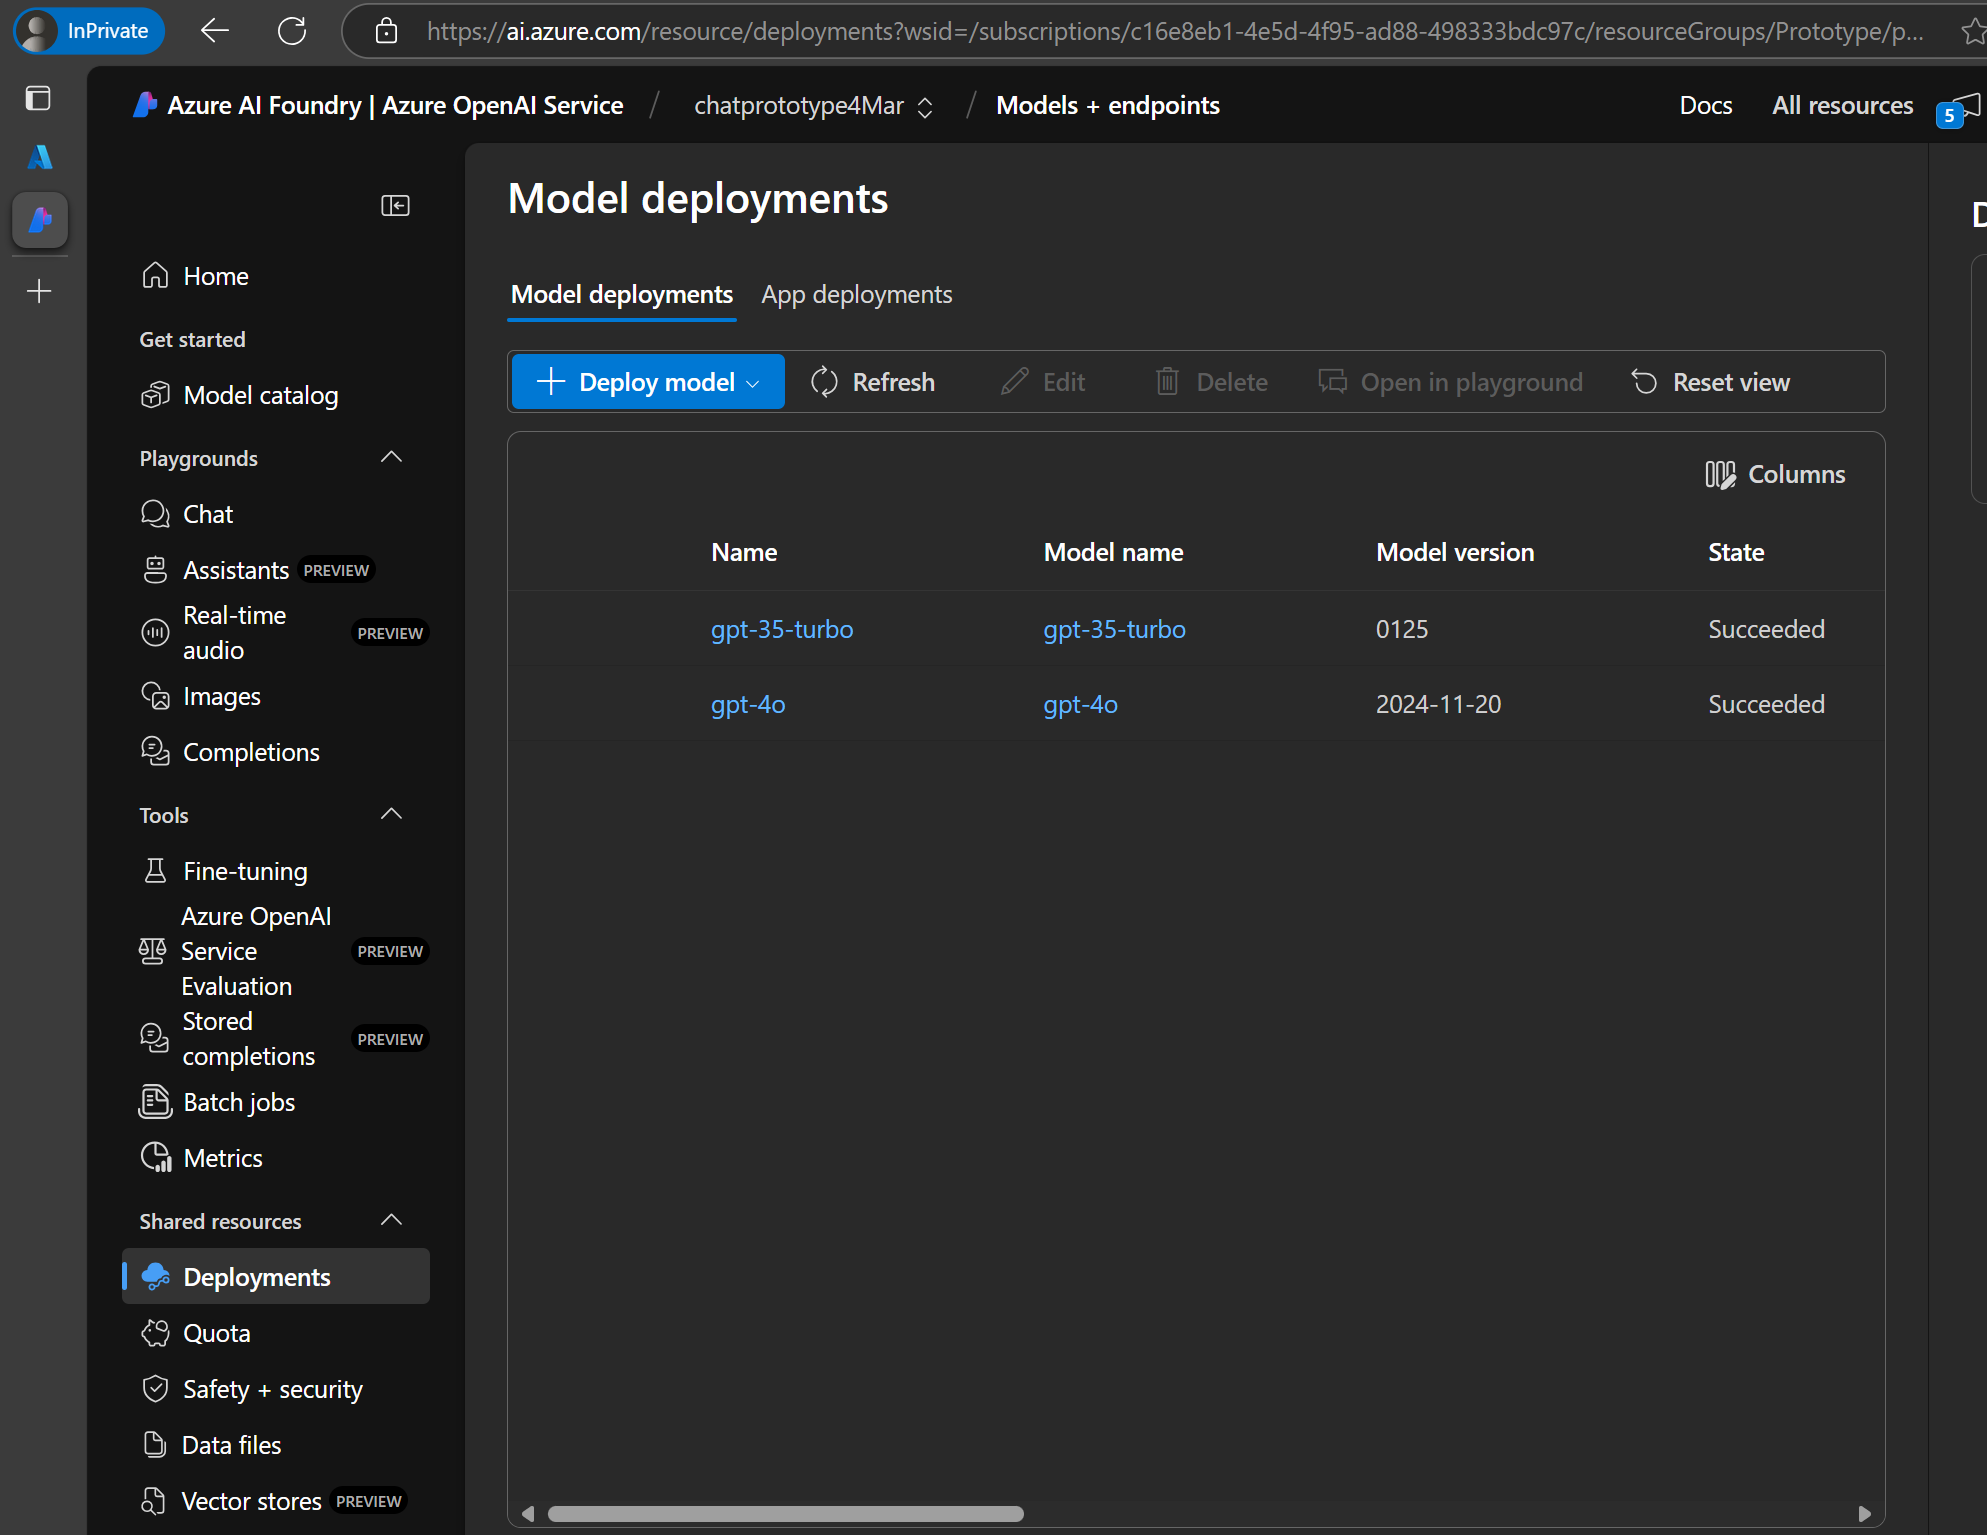
Deployment name location
Find the name
Keys and endpoint location
Find Key & Endpoint
Your provider's portal will look similar.
Never put the Key or Endpoint in front-end code.
They belong server-side, behind a backend route — never in your bundle, never in a public repo.
Name · Key · Endpoint
Session activity
Smart Recipe Recommender
A web app that helps health-conscious, busy folks plan meals by curating creative recipes from available ingredients, dietary needs, and preferred cuisines.
Your task: build the end-to-end prototype by completing one user flow at a time.
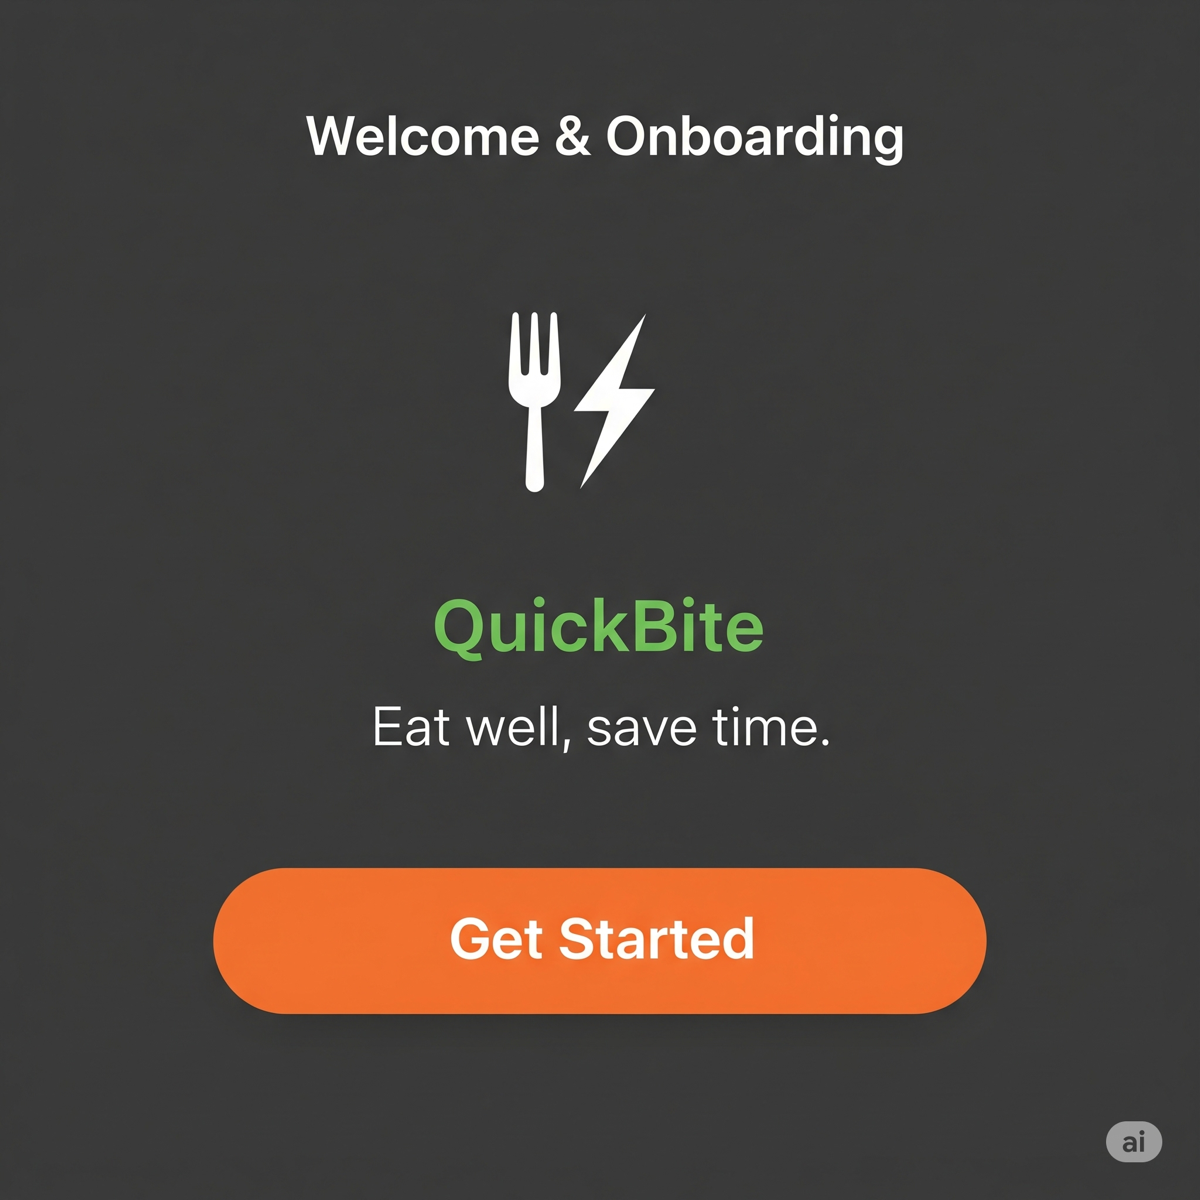
App state — ingredients
View · 01
Pick ingredients
What's in your fridge right now.
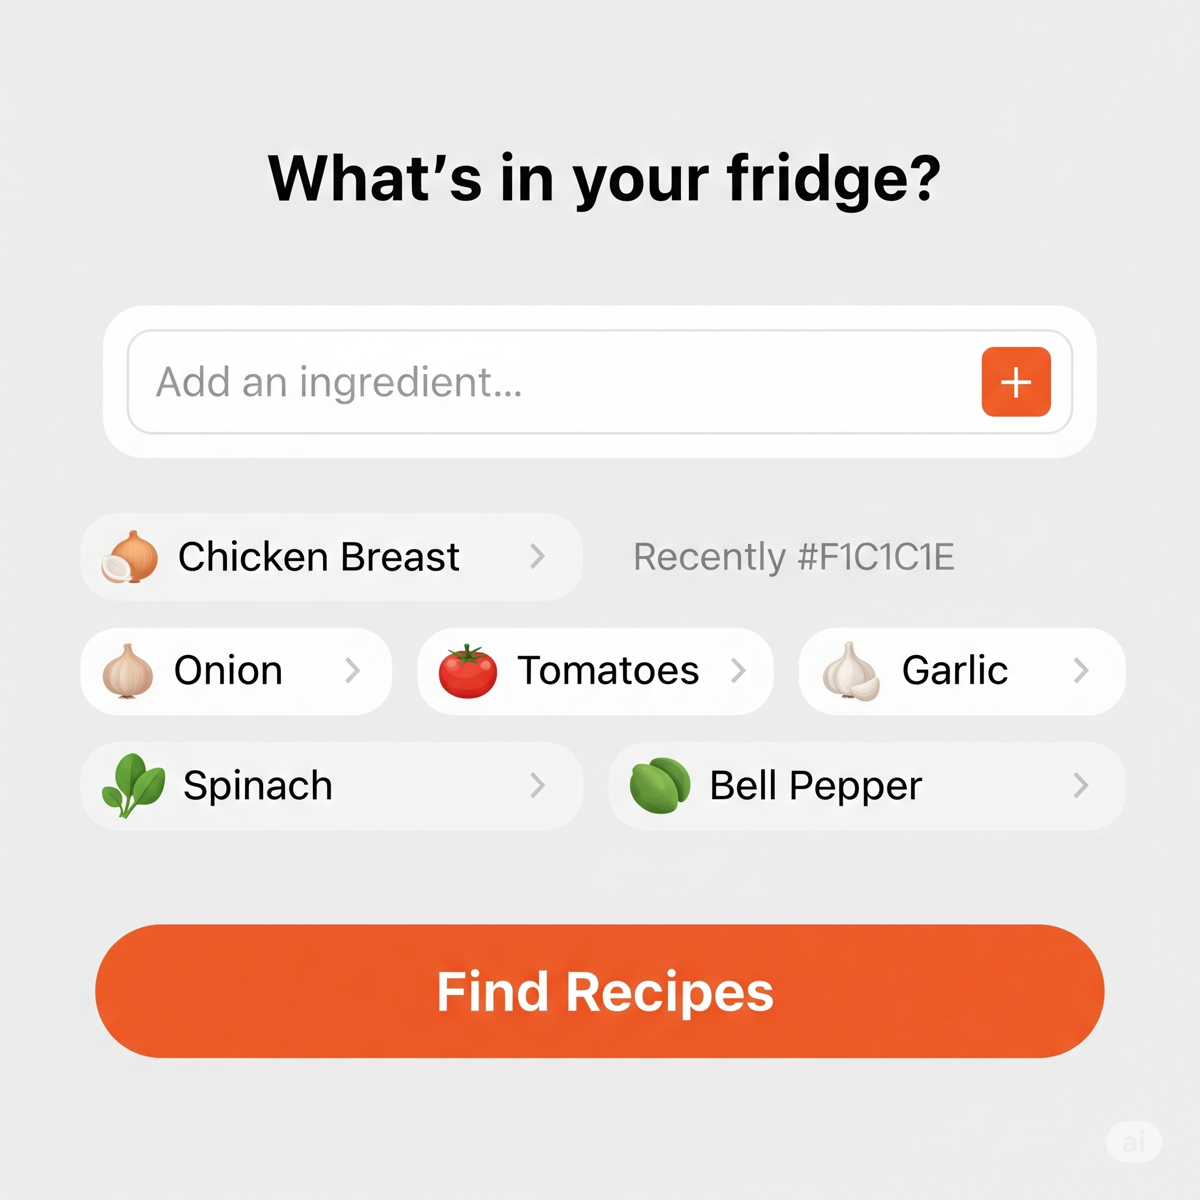
App state — preferences
View · 02
Add preferences
Diet, allergies, cuisine.
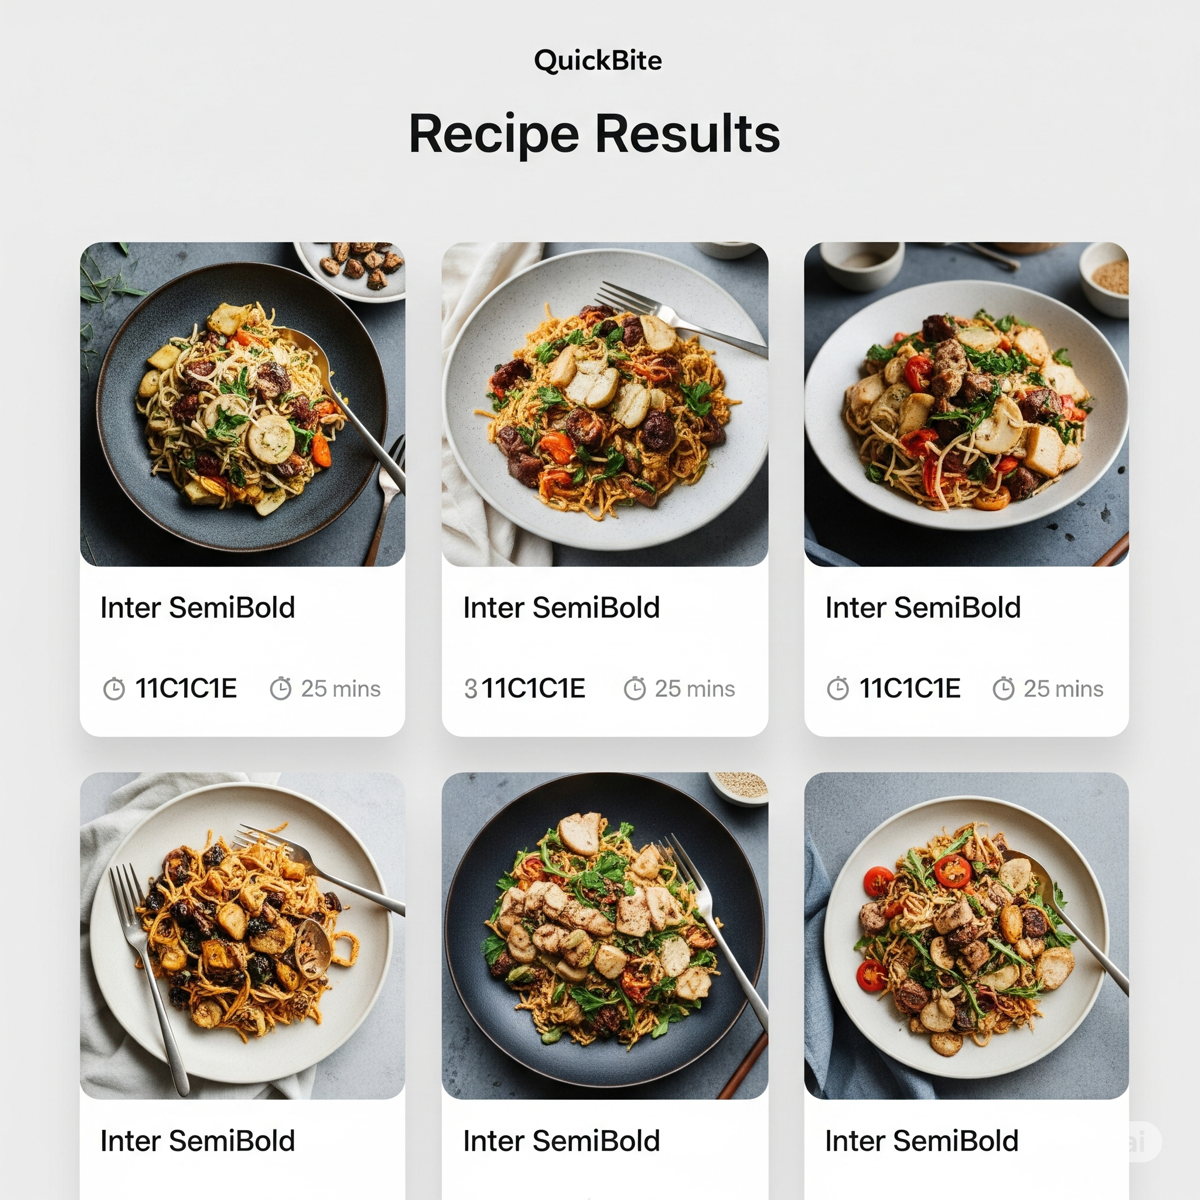
App state — recipes
View · 03
Fetch AI recipes
Curated, ranked, ready to cook.
Note: For the scope of the session, we'll illustrate this iterative process by building one end-to-end user flow.
Activity scope
Stitch front-end, backend and your LLM service
Complete at least one user flow to deliver working functionality end-to-end.
User flow
1
Select ingredients
From a curated grid or freeform input.
2
Add dietary preferences (optional)
Vegetarian, low-carb, allergens.
3
Fetch AI-generated recipes
Backend calls the model and returns ranked ideas.
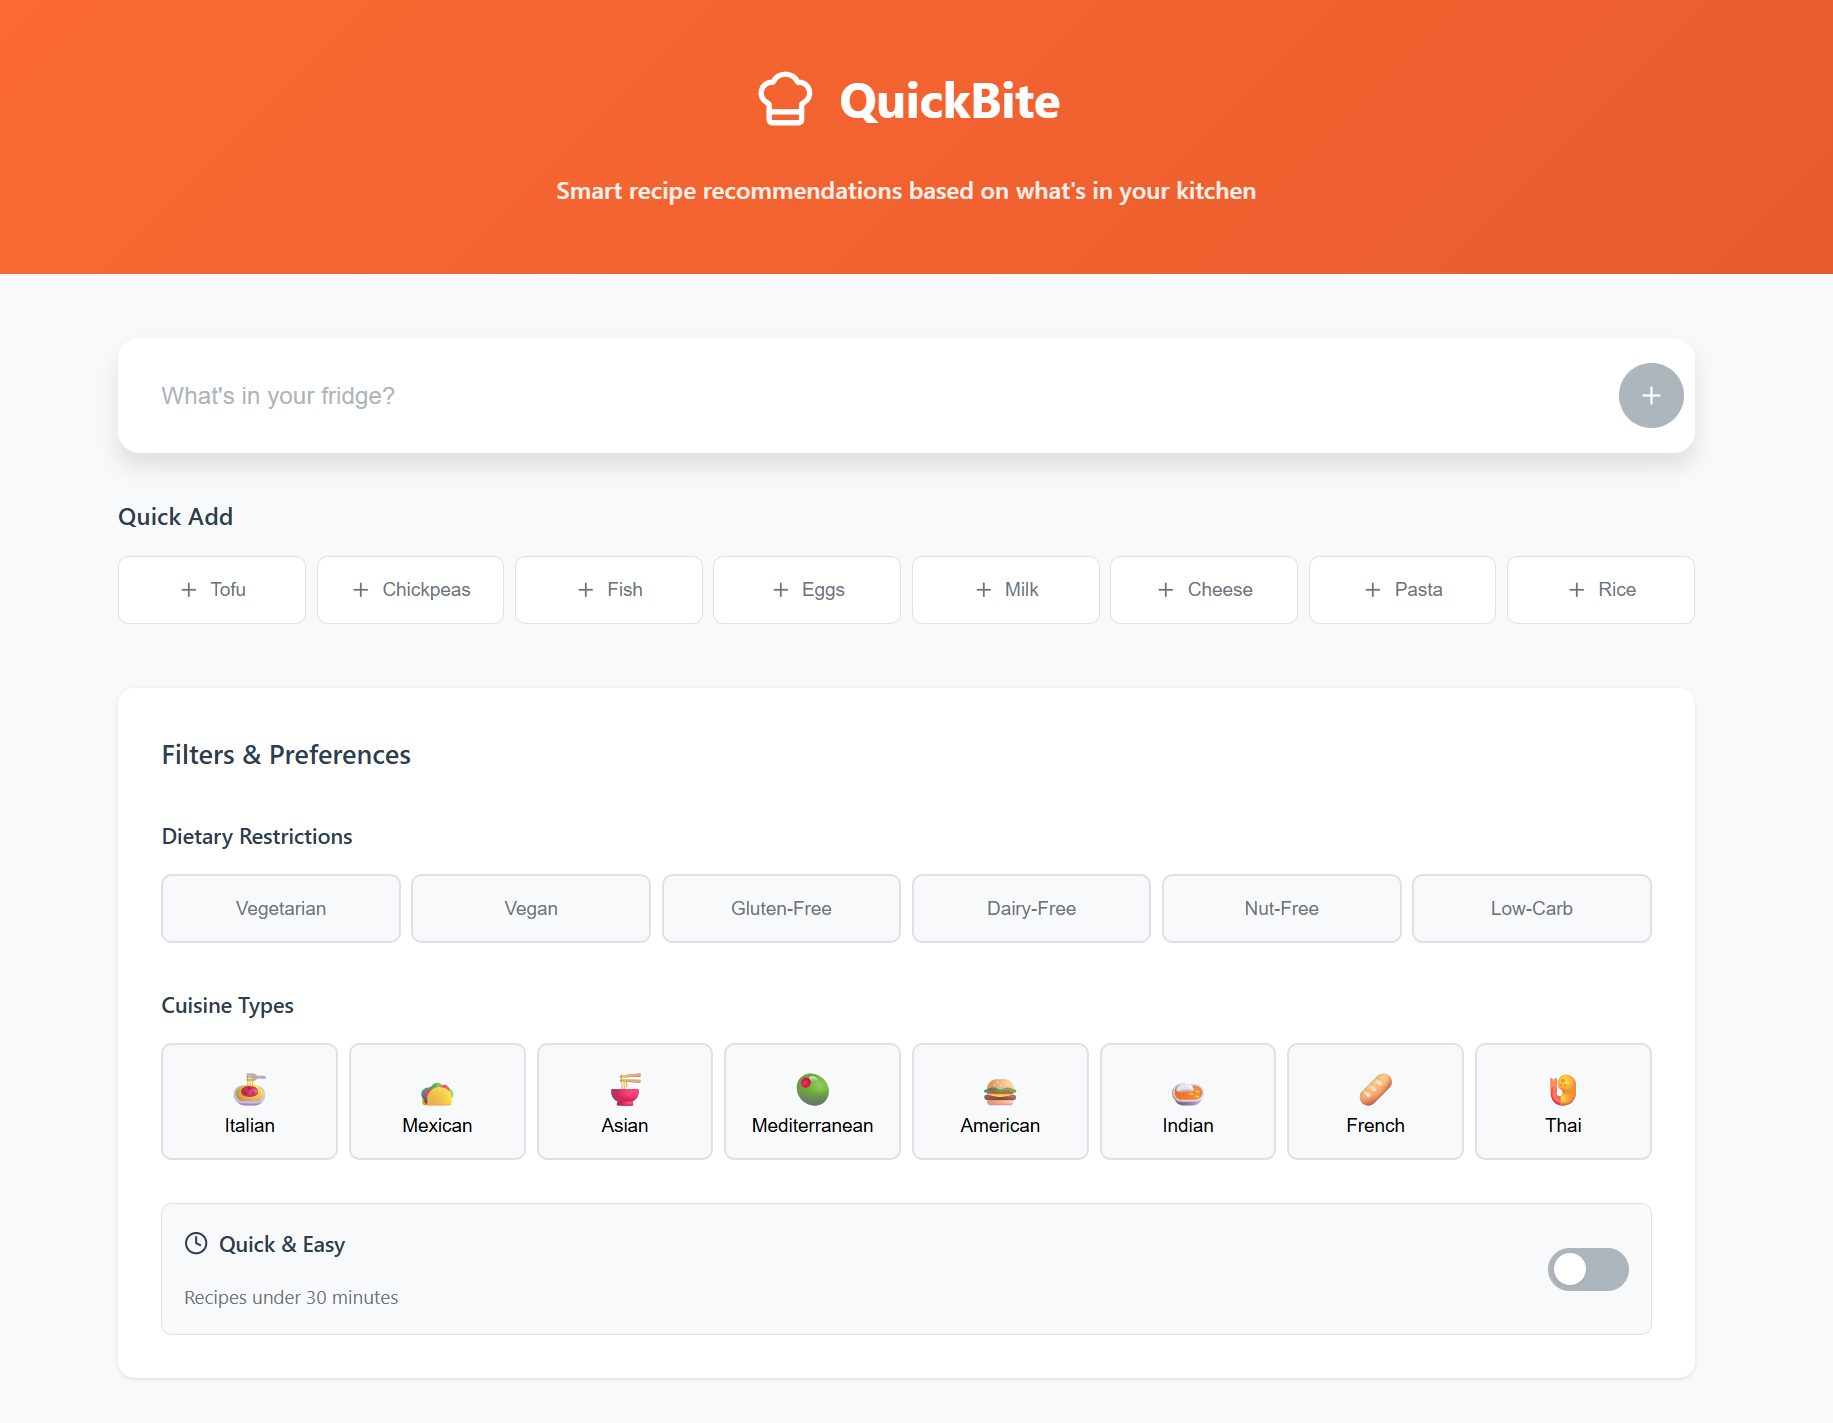
Recipe Recommender flow
Reference flow
One flow · End-to-end · Working
A reminder before we build
Backend-first isn't a phase — it's a posture
Before you ask your coding agent for a single component, anchor the architecture in security and scale.
Front-end only
Quick — until it isn't.
Keys leak into the bundle the moment you ship.
Every new integration becomes a rewrite.
No place to cache, throttle, or log model calls.
Deployment story collapses past one user.
Backend-first
Slower start, exponentially safer.
Secrets stay on the server — client never sees them.
New services drop in behind one stable API surface.
Data, telemetry, and rate-limits live in one place.
Hosting scales out without touching the UI.
prompt · kickoff
// at project start, ask your coding agent:
"Scaffold this app with a backend layer from day one. Keep all LLM and provider keys server-side. Front-end calls our own API routes only."
Posture > Phase
From idea to working AI app
Recommended process
Six stages, in order. Skip one and you'll feel it three stages later.
Research
PRD
Tech architecture
Frontend
Backend
AI system
Customers, market, what's been built before.
Scope, goals, success criteria.
Stack, data flows, contracts.
Skeleton UI, components, states.
APIs, auth, storage, secrets.
Prompts, model calls, evals, guardrails.
Why this order
Research grounds the PRD. The PRD anchors the architecture. The architecture lets you build front and back in parallel. AI is the last layer — not the first — because it depends on every layer beneath it.
Step 01
Build the skeleton UI — with a backend layer baked in
Hand your coding agent a single, well-scoped prompt. Let it scaffold the UI and the backend layer in one shot.
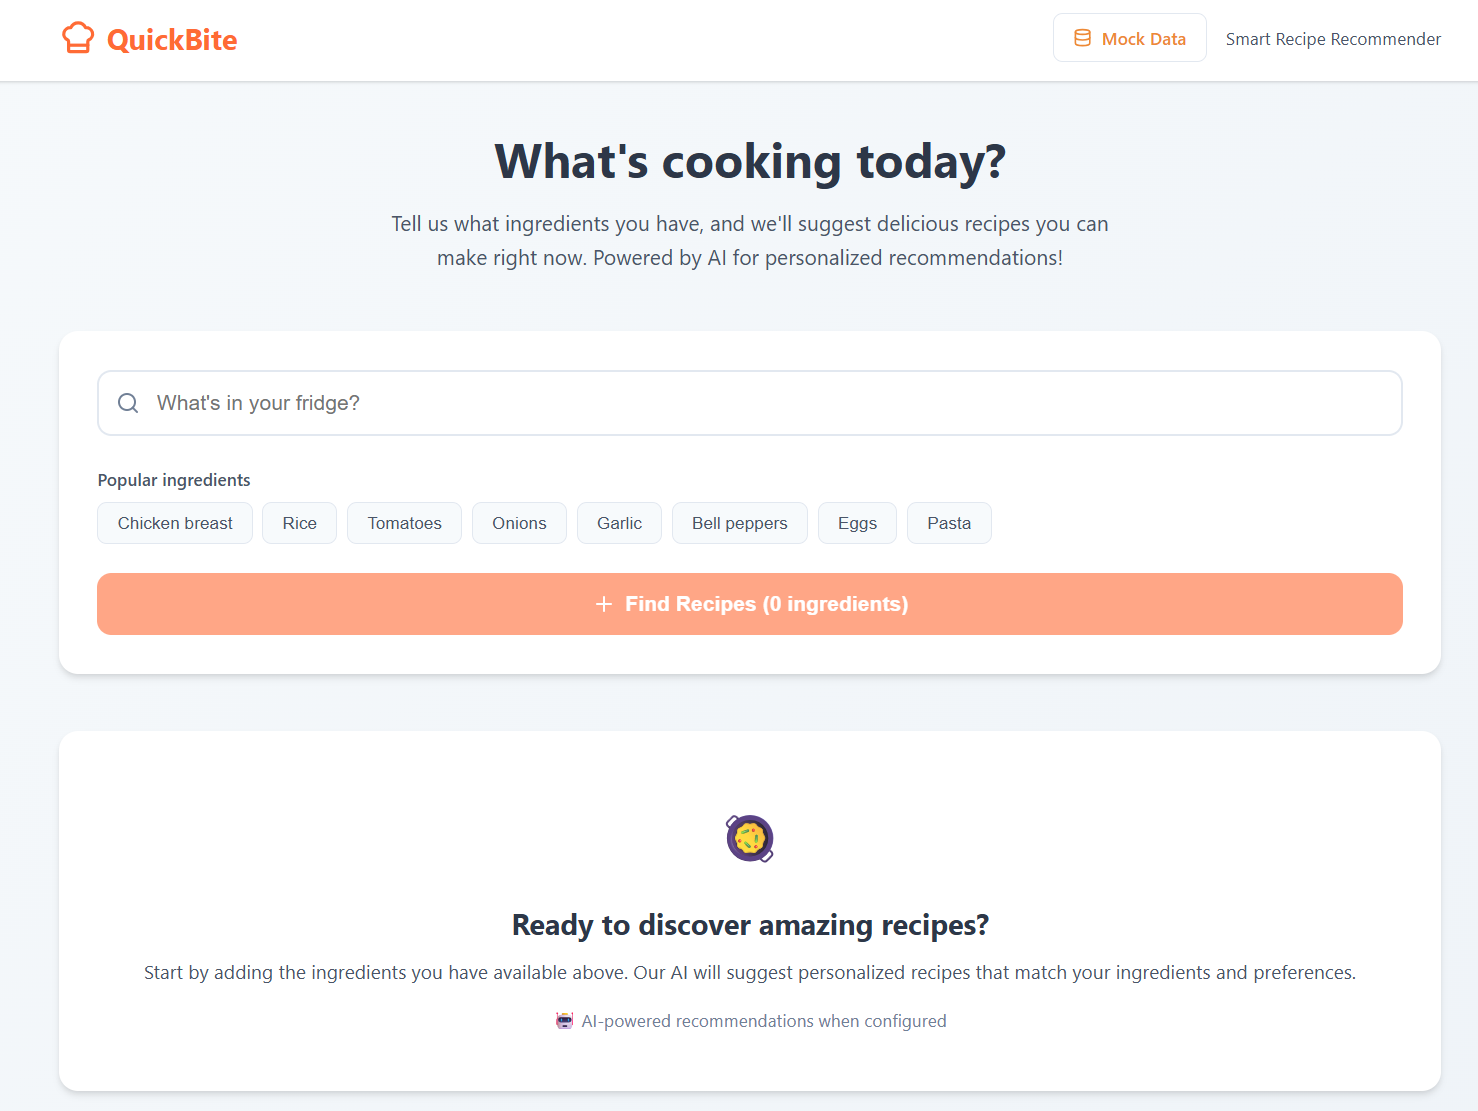
Skeleton UI + backend scaffold
Reference scaffold
Action
Copy-paste the starter prompt
Drop this into your coding agent's chat pane to scaffold the UI and backend in one go.
prompt file
Smart_Recipe_Recommender_UI_BE.md
Customize the prompt template to match your domain, design system, and tech-stack preferences before you send it.
tip
Same idea in Cursor, Claude Code, or Windsurf — the prompt is portable.
UI · Backend · One prompt
How to get the most out of your coding agent
Recommended practices
Five habits that turn a flaky AI scaffolding session into a reliable one.
01
Plan before you start
Write the flow, the data shapes, and the success criteria on paper first. Hand the agent the plan, not the vibes.
PLAN
02
Explain requirements with specs or screenshots
A 200-word spec or a marked-up screenshot beats a 5-line description every time.
SPEC
03
Leverage a design system
Point the agent at your tokens, components, and icon library — control look & feel without micromanaging every class.
DS
04
Prescribe the tech stack
If you have preferences — framework, ORM, hosting target — state them up front. Otherwise the agent will pick for you.
STACK
05
Nudge the agent to test before handoff
Ask it to run the app, click the flow, and screenshot the result — or wire up a Playwright MCP — before it tells you it's done.
TEST
Plan · Spec · Design system · Stack · Test
Best practice · 01
Plan before jumping onto the coding bit
Force a structured approach. Demand an execution plan up-front — otherwise your coding agent tends to skip instructions arbitrarily.
Why it matters
Without an explicit plan, the agent jumps straight into code — combining steps, skipping validations, and leaving you to untangle the diff.
Ask first, code later. A short plan is cheap; a tangled commit is not.
Prompt scaffold
"Before writing any code, give me an execution plan as numbered steps. Wait for my confirmation."
Your coding agent · chat pane
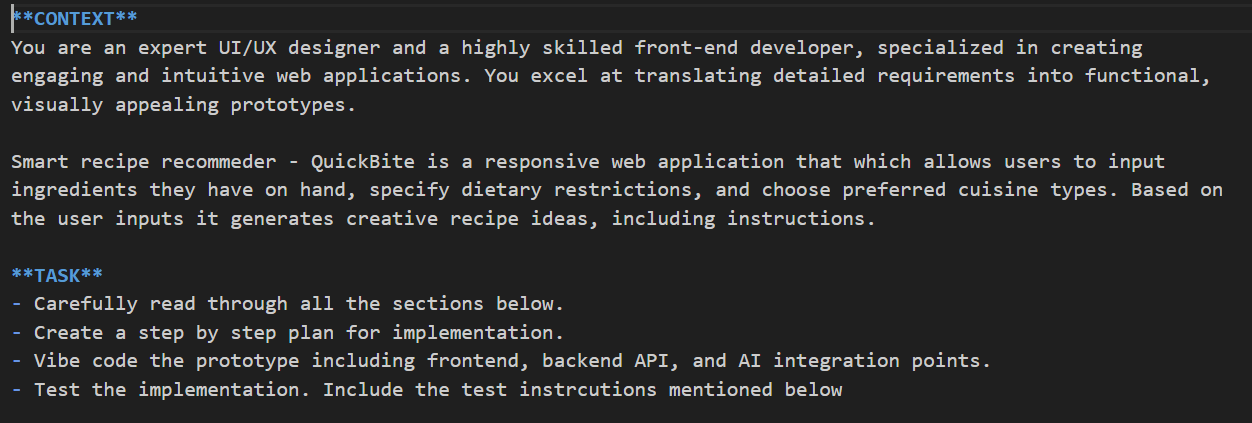
Planning prompt in coding agent
Example coding agent — your tool (Copilot, Cursor, Claude Code…) will look similar.
Step · Plan first
Best practice · 02
Explain your requirements
Describe the user journey. Attach a 'spec-let'. Drop in reference images. Expect to iterate.
A
User journey
Narrate the flow end-to-end — who starts where, what they tap, what they see next.
B
Spec-let
A short markdown brief with acceptance criteria. Saves dozens of back-and-forth messages.
C
Reference images
Screenshots of inspiration, mockups, or your existing design system.
Requirements being attached
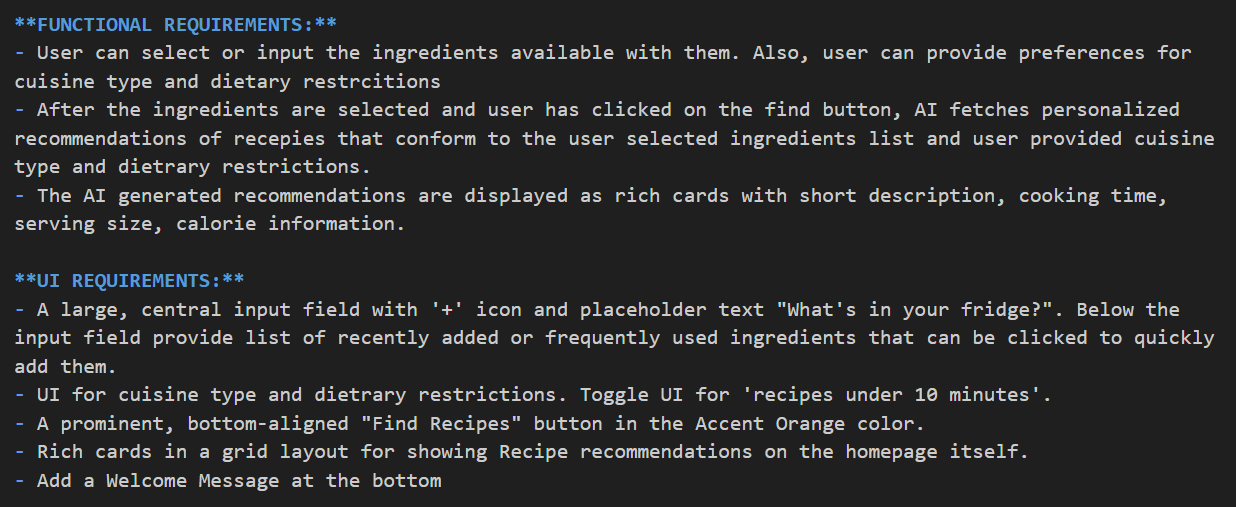
Explaining requirements to coding agent
Example coding agent — your tool will look similar.
Expect multiple iterations. Refining the brief is part of the loop — not a sign of failure.
Best practice · 03
Control the look & feel and the tech stack
A dedicated Design System section in your brief — plus an explicit stack choice — keeps the agent on rails.
Design System section
Articulate look & feel
Define colors, typography, spacing, and component patterns in one place. You can have your agent generate this from session #1 outputs.
Tech stack
Prescribe your stack
Pick deliberately. Example: React frontend + Python backend + your icon system (Fluent, Heroicons, Lucide…).
Design System & stack — captured in the brief
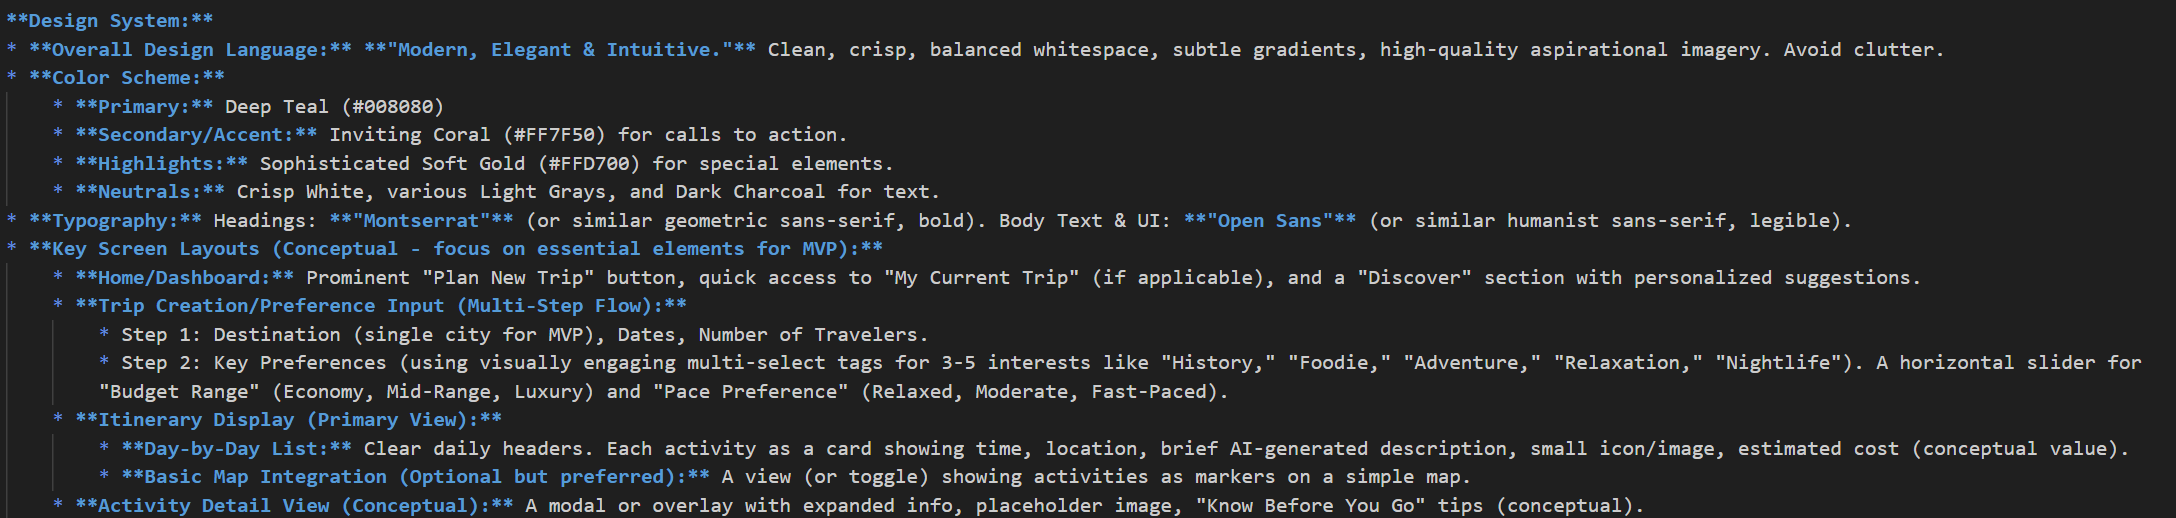
Design system section in chat
Example coding agent — your tool will look similar
Best practice · 04
Ask your agent to test & validate before hand-off
Instruct the agent to do a full test pass on the user flow. Provide your test cases — or have it generate them and return the report.
Option A
Bring your own test cases
Paste the user-flow scenarios you care about. Ask the agent to walk through each, report pass/fail, and fix what breaks.
Option B
Let the agent generate TCs
Ask it to enumerate the test cases first (you sanity-check the list), then run them and return a structured test report.
Test & validation prompt

Test & validate prompt in coding agent
Example coding agent — your tool will look similar.
Verify, don't trust. Treat the test report as evidence — spot-check at least one route yourself.
Step 02
Integrate your LLM via the backend layer
Paste a structured prompt into your coding agent's chat pane and let it scaffold the integration end-to-end.
Smart Recipe Recommender · running example
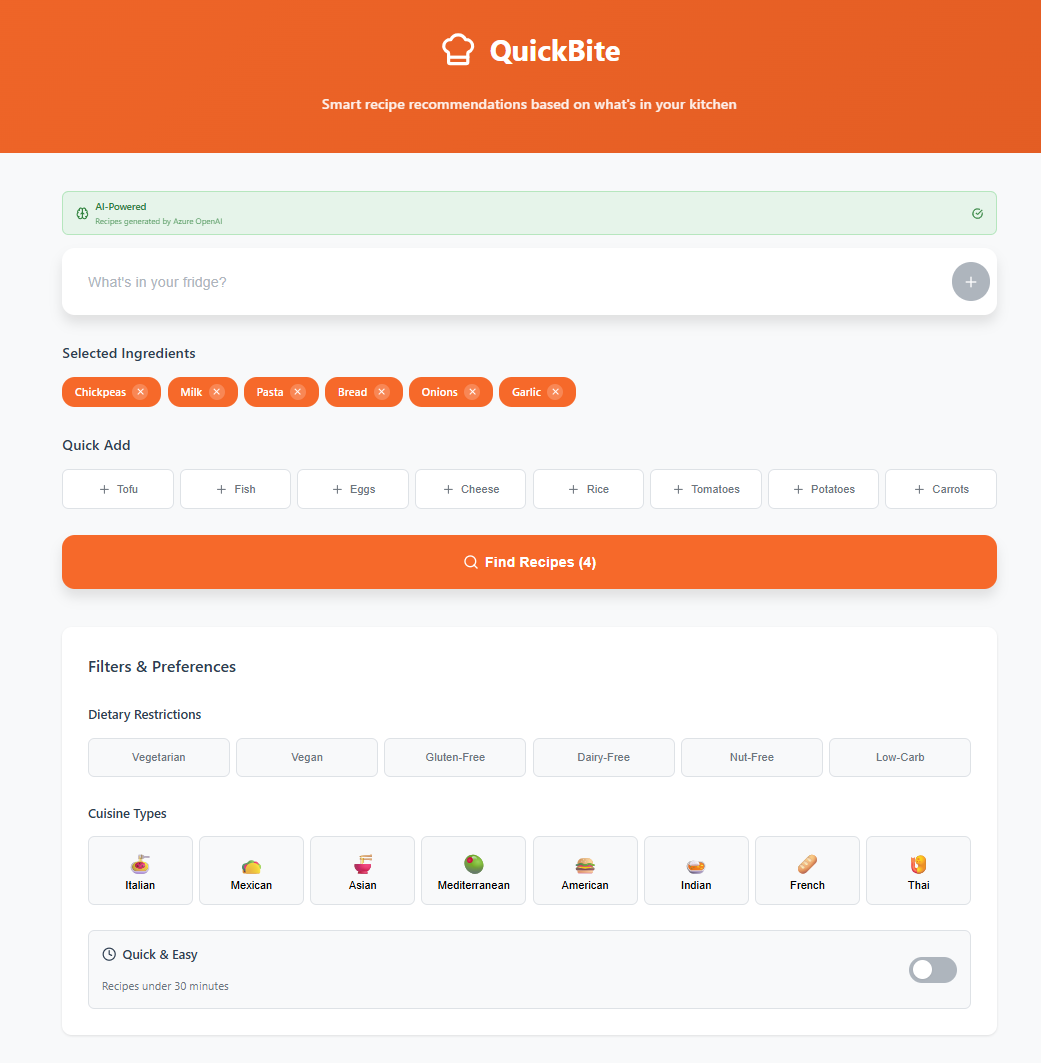
Smart Recipe Recommender app
Action
Paste the prompt
Drop the integration prompt into your coding agent's chat pane and run it.
prompt · markdown
Smart_Recipe_Recommender_AI.md
Customize the template to match your own use case — model name, endpoint shape, response schema.
Step 02 · LLM via backend
Iterating · keep the thread alive
Explain the next requirement while maintaining continuity
When you add a new requirement, re-anchor the agent and ask for a fresh execution plan before any new code lands.
Pattern
Anchor → ask → plan → code
Anchor. Re-state what's done so far.
Ask. Describe the new requirement.
Plan. Demand an execution plan.
Code. Only after you approve the plan.
Continuity beats restarts. Don't open a fresh chat for every new feature — you lose context.
Adding the next requirement · same thread
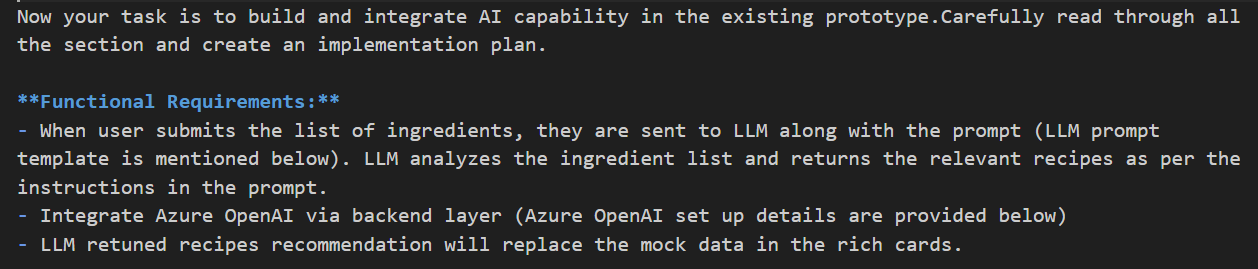
Adding additional requirement to coding agent
Example coding agent — your tool will look similar.
Integration brief
Communicate how you expect the integration to work
Spell out the four dimensions explicitly — vague briefs cause silent regressions.
UI
UI consistency
Reuse existing components & tokens — no one-off styles.
Backend
Backend functionality
Route handler, request/response schema, error states.
LLM
Real LLM API + fallback
Live model endpoint, with mock-data fallback for offline demos.
Compat
Browser & error handling
Cross-browser checks, network failure paths, user-visible errors.
Integration expectations · in the brief
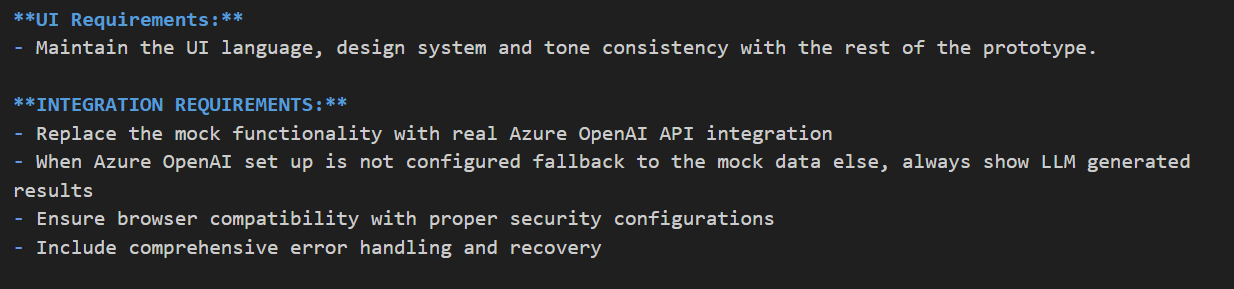
Communicating integration expectations
Example coding agent — your tool will look similar.
Wiring up the model endpoint
Hand the agent your LLM details to set up config
Use the official SDK for your LLM provider, push secrets into env vars, and keep keys out of the front-end — always.
SDK
Use the official SDK
e.g. openai, anthropic, @aws-sdk/client-bedrock-runtime.
env vars
Set environment variables
Endpoint, deployment name, API key, model ID — all from process.env.
.env file
Create a .env file
Add to .gitignore. Never check in. Never bundle into the client.
Endpoint + key handed to the agent
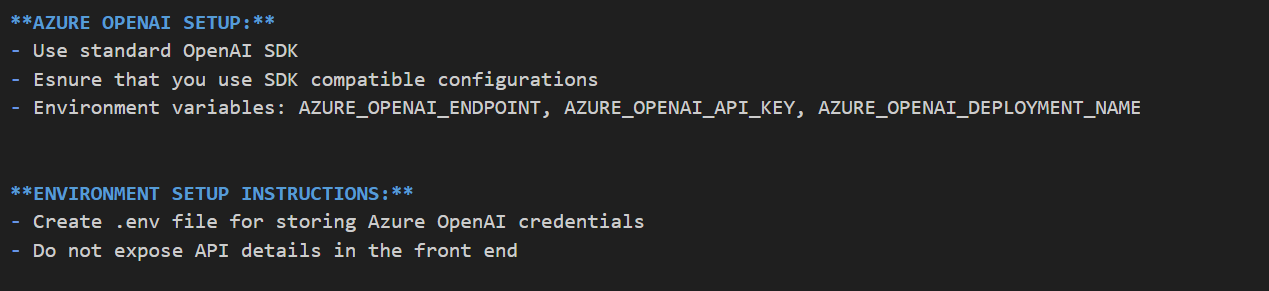
Adding LLM details for configuration
Keys never live in the browser. All model calls go through your backend.
Resilience & thrift
Build a fallback to preserve your free credits
Detect whether your LLM service is configured. If not, gracefully switch to mock data — perfect for offline demos and saving credits while iterating on UI.
Decision flow
If env vars present → call the live model endpoint.
If not configured → return curated mock data.
If the live call fails → fall back to mock + log.
Benefits
Demo works on planes, in pitch rooms, behind firewalls.
Front-end iteration doesn't burn paid tokens.
Reviewers can clone & run without credentials.
Fallback being requested
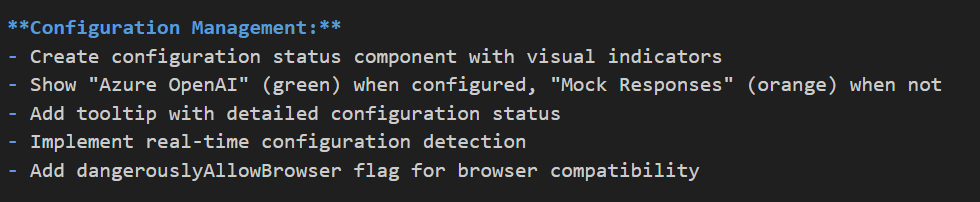
Fallback mechanism prompt
Example coding agent — your tool will look similar.
Always-on demo. The audience never sees a broken state — even when your wifi does.
Prompt engineering
Provide your custom prompt for the model to execute
Two ways to play it: (1) hand your agent the prompts you already trust, or (2) ask it to author a prompt that matches your use case.
Option A
Bring your own prompt
Instruct the agent to use your prompt when calling the LLM service — verbatim, with parameter substitution.
prompt instruction
Use the prompt in /prompts/recipe.md exactly as written when calling the model endpoint.
Option B
Let the agent build one
Describe the use case and ask the agent to author a prompt — system message, structure, output schema and all.
prompt request
Build a prompt for the recipe recommender — system + user + JSON output schema. Then wire it into the route handler.

Custom prompt provided to coding agent
Example coding agent — your tool will look similar
Step 2.1
Replace placeholders with real credentials
Manually update the .env file with your real LLM API credentials and set the AI_Enabled flag to true. The file lives inside the backend/ folder.
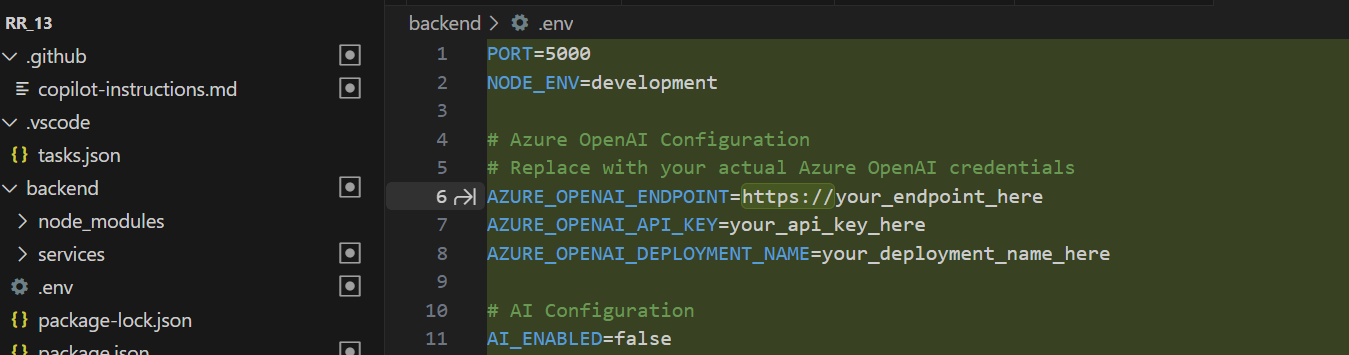
Auto-generated .env with placeholder credentials
Before
Auto-generated .env file with placeholder LLM API credentials.
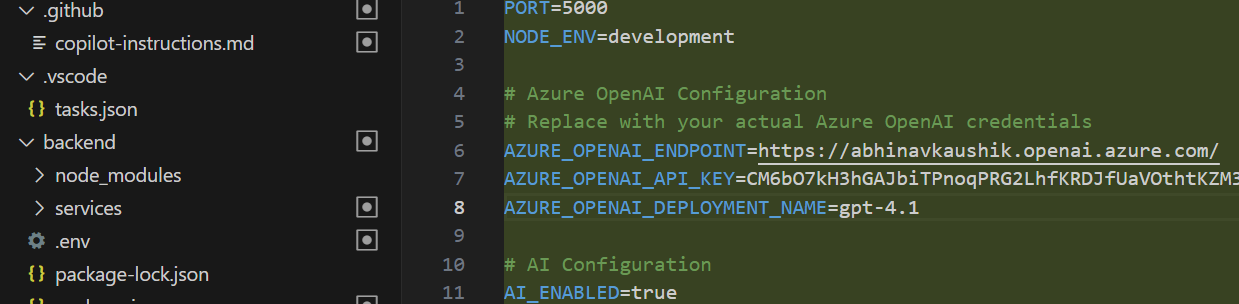
Manually updated .env with real credentials
After
Manually updated .env with your actual endpoint & key. <your-resource>.openai.example.com
Step 2.2
Nudge your coding agent to restart the server to pick the updated .env
Common issue
Server may not pick the updated .env.
Nudge the agent to investigate and fix the underlying issue.
Common issue
Agent creates .env_example instead of .env.
Remind it explicitly to create the actual .env file.
Part 3
Resources
Pitfalls, patterns, and process tips for getting more out of your coding agent.
Know what you're working with
Cognitive deficits of your agent
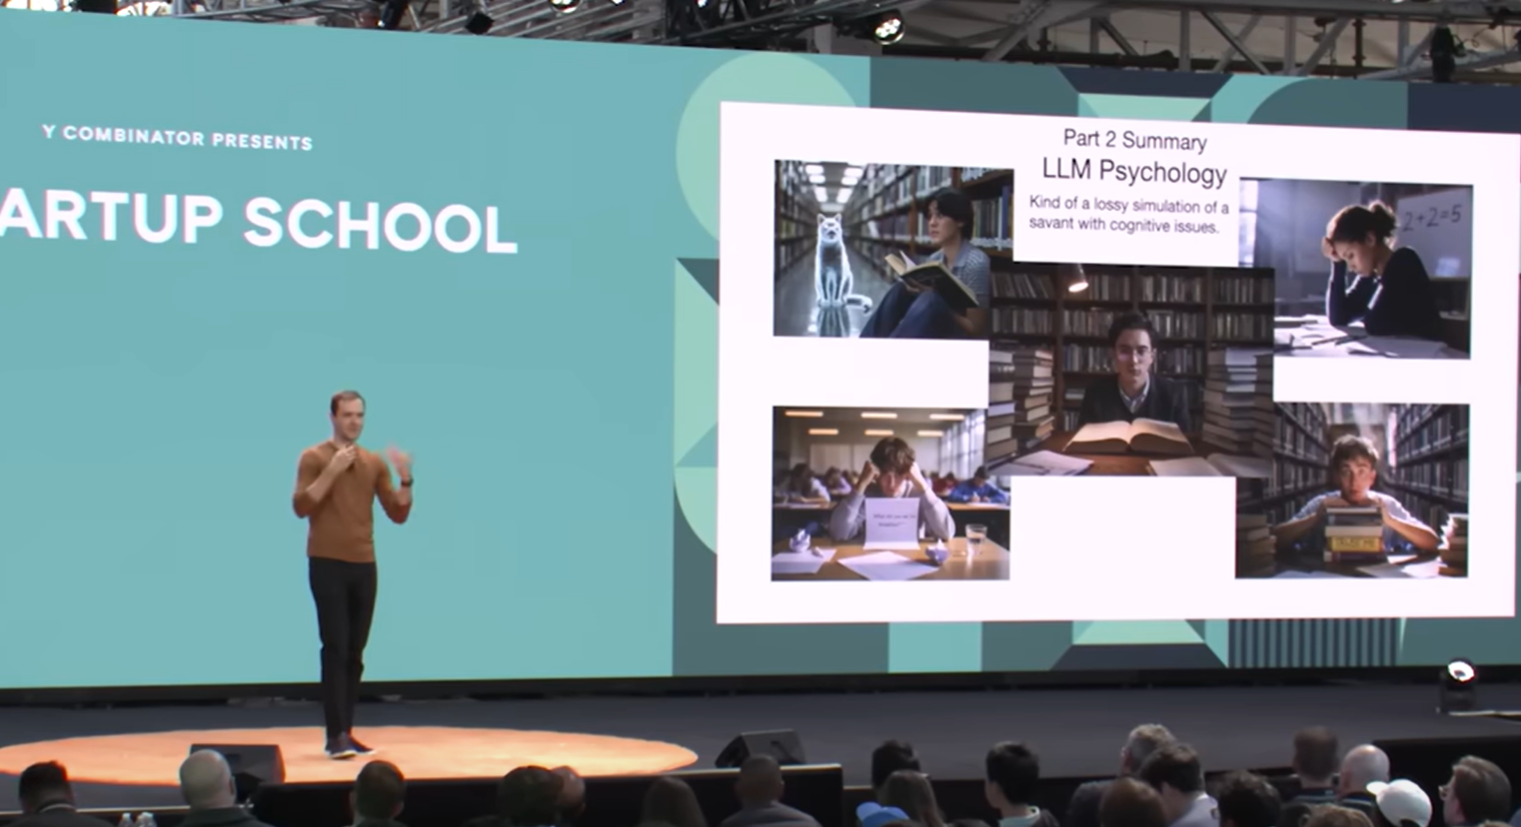
Andrej Karpathy at Y Combinator Startup School
Reference
Excerpts from "Software is changing again" — Andrej Karpathy at Y Combinator Startup School.
Deficit Manifestation in prototyping
Hallucination Believes it completed a task it never did. Assumes code exists when it doesn't.
Jagged intelligence
(how many Rs in strawberry?)
Wrong logic in code, leading to bugs it struggles to discover on its own.
Anterograde amnesia
(always a new employee)
Starting a new chat makes the agent forget all prior work and conversations.
Gullibility Prompt-injection risk. The AI in your prototype could leak API keys or other secrets.
Sycophancy Your POV could be wrong, but the agent goes ahead and "fixes" it anyway.
A mental model
The agent is an employee, the process is an organisation
Each stage takes a messy braindump in, runs it through a focused agent, and emits a structured artifact.
01
Input
Idea braindump
Agent
Research agent
Output
Strategy document
02
Input
PRD braindump
Agent
Your coding agent
Output
High-level PRD
03
Input
Design ideas
Agent
Your coding agent
Output
Frontend code
04
Input
Page & feature PRD
Agent
Your coding agent
Output
Final app
Safety net
Use git versioning
"I worked 10 hours over the weekend to make a cool demo. Tried fixing a bug just before the presentation with my manager and it broke the entire code."
Prompt
Implement a git versioning system with multiple branches. I want a production branch, a development branch, and feature-specific branches. Have them on my local and remote GitHub. We will always build on the feature-specific branch. Make commits only when I explicitly ask you to.
Tip
Keep your best code on the production branch. Make changes on feature-specific branches and merge into development only once confident. Roll back to any checkpoint using the commit hash as a reference.
Branch model
main
production
develop
integration
feat/login
in progress
feat/checkout
in progress
Roll back with git checkout <commit-sha> when something goes sideways.
Trust, but verify
Make your agent run tests before it completes the task
"It assumes the feature works after every change but it never really makes it work."
"I was working on a different flow and it introduced a bug elsewhere which I never caught."
Prompt
Create a script to run automated tests on the smallest units of our app. Every time you add a new feature, also add new unit tests — you need to write the tests yourself. After any change, run the test script and ensure everything passes. On failure, debug and re-run before declaring done.
backend
Unit / API tests
Share the PRD context so the agent can write meaningful test cases.
frontend
Browser tests
Use MCP servers (Playwright for browser, others for filesystems / APIs) so the agent can drive a real browser.
llm / model
Eval scripts
Quick eval scripts to test model output for accuracy, hallucinations, and edge cases.
Tip
Save a custom instruction so the agent always runs tests as part of its "definition of done".
Tests, part two
Don't forget the AI part — build evals
Unit tests verify deterministic code. They cannot tell you whether your prompt is producing the right answer. That's what evals are for.
Why eval the model separately
A passing unit test does not mean the LLM responded usefully.
Prompt changes silently regress quality — nothing else will catch it.
Model upgrades flip behavior. Evals are how you sleep at night.
Edge cases (long inputs, weird formats, adversarial users) need known answers.
Eval prompt
Build an eval script for the AI feature. Define a small set of golden test cases — input prompts and the ideal output. For each case, call the model, compare to expected (exact match, contains, or LLM-as-judge), and report pass / fail with a score.
What goes in an eval set
happy path
edge case
jailbreak
long input
empty input
multi-lingual
Tip
Run evals on every prompt change, not just every code change. Treat the prompt as a versioned artifact.
Share with others
Deploy your app to the cloud
Hosting your prototype on a live URL unblocks UX testing and stakeholder feedback — no more "works on my laptop".
Prompt
Host my app on [your cloud provider]. Use GitHub Actions with a workflow file to complete the build and make the deployment using the provider's CLI. Configure the domain so the app is reachable. The build should trigger automatically on every commit.
Tip
Wire up one deployment per branch so each feature branch gets its own preview URL — perfect for quick A/B feedback.
CI / CD loop
1
Push commit to GitHub
2
GitHub Actions runs the workflow
3
Build + cloud CLI deploy
4
Live URL — share with anyone
works on: Azure · AWS · GCP · Vercel · Render · Fly.io
Guard-rails
Conversational tips with your agent
Six rule-types you can drop into any prompt. Each one is a guard-rail — structure beats vibes.
Rule type (guard-rail) Use it when you want the AI to… Say it like this in your coding agent's chat
1. Scope Touch only a specific file, screen, or component. "Work only in checkout_page.jsx, nothing else."
2. Outcome / Goal Deliver a clear end-result, not random tweaks. "Add a 'Dark Mode' toggle that flips our primary colours."
3. Brand & Style Keep colours, fonts, spacing on-brand. "Follow our design tokens: primary=#0052CC, radius=8px."
4. Constraints Avoid risk — new libraries, API changes, PII exposure. "Do NOT add new packages or collect extra user data."
5. Feedback / Preview Show a quick mock before finalising. "Give me a visual diff or screenshot preview first — no file overwrite yet."
6. Test / Validation Prove it works without a deep code review. "Include a quick self-test: toggle Dark Mode on/off and log state."
First things first — continued
Design to scale contd
A framework for building a scalable and secure prototype.
01
Plan for future integrations
Telling your coding agent which integrations are coming next helps it design an architecture that accommodates new APIs, services, or data sources with minimal disruption.
02
Prioritize backend development
Build the backend layer alongside the front-end. It saves a lot of rework later in the cycle, when increasing complexity raises the risk of unexpected breaks.
03
Integrate services via backend
Integrating services (including AI) via the backend reduces security risk — credentials and business logic stay server-side, reducing exposure.
In the upcoming slides we follow this framework to build a scalable, future-integration-ready prototype.
Recap
Journey so far..
We learned to…
Convert our concept into impressive, cohesive visual designs.
Configure VS Code to integrate with our coding agent, navigating its occasional quirks.
Develop a click-through UI prototype that simulates the complete user journey.
Inadvertently, we may have felt lacking control…
The agent independently selected design elements and interactions.
We had limited input on the technology stack used to build the prototype.
The process varied across individuals, even given identical instructions or prompts.
Most importantly, we had reservations about creating a full prototype for the larger initiative.
The shape of the process
Sequential vertical focus turns a vague idea into shippable code
Six stages, each with a defined input, output, and set of tasks. Don't skip ahead.
1
Research
2
PRD
3
Tech architecture
4
Frontend
5
Backend
6
AI system
Research
  • Problem framing & goals
  • Stakeholder & user mapping
  • Competitive / comparable analysis
PRD
  • Outcome-oriented feature list
  • User stories / jobs
  • Acceptance criteria
Tech architecture
  • System context diagram
  • Component & service decomposition
  • Data model / schema
Frontend
  • Interaction flow
  • Design system
Backend
  • API endpoint definition
  • Business logic
  • Data persistence
AI system
  • Prompt instruction
  • Orchestration
  • Data context
  • Evaluations
Vague idea → shippable code
01/42
navigate · F fullscreen